
Tag: power training

  • Medicine Ball Training for Adults: Power, Core & Results

    Medicine Ball Training for Adults: Power, Core & Results

    Medicine Ball Training for Adults: Power, Core & Results

    If you’ve been walking past that dusty medicine ball at the gym without a second glance, you’re leaving serious fitness gains on the table.

    Here’s a scenario that might sound familiar: you’ve been consistent with your workouts for months, but something feels off. Your strength has plateaued. Your core still feels weak when you’re carrying groceries or playing with your kids. And the same old dumbbells and machines just don’t feel challenging anymore.

    That’s where medicine ball training comes in — and it might be exactly the missing piece in your fitness routine.

    Medicine ball training for adults is one of the most underused yet incredibly effective tools in the fitness world. It builds functional strength, challenges your core from every angle, develops explosive power, and can be adapted for any fitness level — beginner to advanced. Whether you’re 25 or 60, this type of training translates directly into real-life movement quality and long-term physical resilience.

    In this guide, you’ll discover what medicine ball training actually does to your body, how to get started safely, common mistakes to avoid, and what kind of results you can realistically expect.

    Why Medicine Ball Training Matters More Than You Think

    Most adults focus on either strength training or cardio — and while both are essential, they often miss a critical component of physical fitness: power. Power is your body’s ability to generate force quickly, and it’s one of the first fitness qualities to decline with age.

    According to the American College of Sports Medicine (ACSM), muscular power decreases at a faster rate than muscular strength as we age — often beginning as early as your mid-30s. This directly affects your ability to perform everyday tasks like catching yourself from a fall, lifting a heavy bag overhead, or sprinting to catch a bus.

    Medicine balls are uniquely designed to train power. Unlike a dumbbell — which you lift and lower in a controlled manner — a medicine ball can be thrown, slammed, rotated, and caught. These dynamic, multi-directional movements recruit your entire kinetic chain: from your feet and legs, through your hips and core, all the way to your shoulders and arms.

    A review published in the Journal of Strength and Conditioning Research found that medicine ball training significantly improved power output, core stability, and sport-specific performance across multiple age groups. But the benefits aren’t just for athletes. For everyday adults, that same power translates into better posture, fewer injuries, and a more capable body in daily life.

    If you’re already doing dumbbell training or working on core strength with Pilates, adding medicine ball work is a natural and highly effective progression.

    The Science Behind Medicine Ball Training: How It Actually Works

    Medicine balls work differently from most gym equipment, and understanding why makes it easier to use them effectively.

    When you perform a medicine ball slam or a rotational throw, you’re engaging what exercise scientists call the "stretch-shortening cycle" — a rapid sequence where your muscles first lengthen (eccentric phase) and then explosively shorten (concentric phase). This trains your neuromuscular system in a way that slow, controlled lifting simply doesn’t.

    This translates to better intramuscular coordination, which means your brain and muscles communicate more efficiently. The result? You become more athletic, more reactive, and stronger in functional movement patterns — not just in isolated exercises.

    Busting a common myth: Many people think medicine balls are only for athletes or physical therapy. In reality, medicine ball exercises can be completely scalable. A 4 lb ball and a wall slam is appropriate for a 55-year-old recovering from a sedentary lifestyle, while a 20 lb ball and a partner overhead throw is appropriate for a trained 30-year-old. The tool adapts to you.

    A study published in the Journal of Human Kinetics showed that just 8 weeks of medicine ball training in adults who were not competitive athletes led to significant improvements in core endurance, rotational strength, and balance — three pillars of healthy functional movement.

    The other key mechanism is core activation. Almost every medicine ball exercise, even those that seem upper-body focused, requires your core to brace, resist rotation, or transfer force. This makes medicine ball training one of the most time-efficient ways to build a strong, stable midsection — without doing a single crunch.

    How to Get Started with Medicine Ball Training

    The good news: you don’t need a full gym setup. Many medicine ball exercises require just a ball and a wall — or a ball alone.

    Step 1: Choose the Right Weight

    This is the most important starting decision. Too heavy and you’ll sacrifice form; too light and you won’t generate any real training stimulus.

    • Beginners: 4–8 lbs for women, 8–12 lbs for men
    • Intermediate: 8–14 lbs for women, 12–20 lbs for men
    • Advanced: 14–20+ lbs for women, 20–30 lbs for men

    A good rule of thumb: if your form breaks down or you feel your lower back straining, drop to a lighter ball.

    Step 2: Master These Foundational Movements

    1. Wall Ball Shot
    Stand 2–3 feet from a wall, holding the ball at chest height. Squat down, then explosively drive through your hips and throw the ball against the wall at a target about 8–10 feet high. Catch it and repeat. This trains leg power, hip extension, and overhead pressing strength simultaneously.

    2. Overhead Slam
    Stand with feet shoulder-width apart, lift the ball overhead with both arms extended, then slam it forcefully into the ground as you hinge at the hips. This is one of the best full-body power exercises you can do — and it’s incredibly satisfying.

    3. Rotational Wall Throw
    Stand sideways to a wall, ball in both hands at hip level. Rotate your torso away from the wall, then explosively rotate back and throw the ball against it. Catch and repeat. This develops anti-rotational core strength and rotational power.

    4. Russian Twist
    Sit on the floor with knees bent, holding the ball in both hands at chest height. Lean back slightly and rotate the ball from side to side. Keep your core engaged throughout. This is your core stability and oblique builder.

    5. Medicine Ball Deadlift
    Place the ball on the floor between your feet. Hinge at the hips, grab the ball, and stand up explosively. This is a beginner-friendly way to learn the hip hinge pattern before progressing to heavier implements.

    Beginner Starter Routine (2–3x per week):

    • Wall Ball Shot — 3 sets of 8 reps
    • Overhead Slam — 3 sets of 8 reps
    • Russian Twist — 3 sets of 12 reps per side
    • Rest 60–90 seconds between sets

    Intermediate Add-On: Add the Rotational Wall Throw (3 sets x 10 per side) and replace the medicine ball deadlift with a squat-to-press variation.

    Common Mistakes That Sabotage Your Medicine Ball Results

    Medicine ball training is accessible, but it’s easy to fall into patterns that reduce effectiveness or increase injury risk. Here are the most common errors — and exactly how to fix them.

    Mistake 1: Going Too Heavy, Too Fast
    Because medicine balls feel less intimidating than barbells, many people grab a ball that’s far too heavy for the movements they’re attempting. Heavy balls slow down the explosive component of the exercise, which defeats the purpose. Start lighter than you think you need to — you can always progress. Focus on speed and snap, not just load.

    Mistake 2: Neglecting the Bracing Pattern
    A lot of beginners forget to actively engage their core before and during each rep. This is especially common during slams and throws. Without proper bracing, you shift stress to your lower back instead of distributing it across your core. Fix this by taking a breath in before each rep, bracing your abs like you’re about to be punched, and moving from that stable base.

    Mistake 3: Treating It Like Slow Strength Training
    Medicine ball exercises are meant to be explosive. If you’re doing overhead slams at the same pace as a dumbbell curl, you’re missing the neuromuscular benefit entirely. The goal is maximum intent — even if the weight is light, move it with full power and speed. Think "as fast as possible," not "as heavy as possible."

    Mistake 4: Skipping Unilateral and Rotational Work
    Many adults default to bilateral movements (both hands on the ball, both feet planted). While these are great for building a foundation, the real magic of medicine ball training happens in rotational and single-side movements. These mimic how your body actually functions in daily life and sports. Don’t skip the rotational wall throw or single-arm passes just because they feel awkward at first.

    Mistake 5: Not Warming Up the Hips and Shoulders
    Medicine ball exercises frequently demand full range of motion from the hips, thoracic spine, and shoulders. Jumping in cold dramatically increases strain on these joints. A 5-minute dynamic warm-up — including hip circles, shoulder rolls, and light band pull-aparts — is non-negotiable before any medicine ball session.

    Nutrition to Support Medicine Ball Training

    Power-based training like medicine ball work has specific nutritional demands that differ slightly from traditional strength or endurance training.

    Protein: Your muscles need adequate protein to recover from explosive training. The Academy of Nutrition and Dietetics recommends 1.2–1.7 grams of protein per kilogram of body weight for active adults. For a 170 lb adult, that’s roughly 93–131 grams per day. Prioritize lean sources: chicken breast, Greek yogurt, eggs, fish, and legumes.

    Carbohydrates: Don’t undereat carbs when doing power training. Explosive movements rely heavily on glycogen — the stored form of carbohydrate in your muscles. Aim for complex carbs like oats, sweet potatoes, brown rice, and fruit around your training sessions.

    Pre-workout timing: Eat a balanced meal containing both carbs and protein 1.5–2 hours before training. If you’re training first thing in the morning, a banana with almond butter 30–45 minutes prior can be enough to fuel the session.

    Hydration: According to the ACSM, even mild dehydration (as little as 2% body weight loss from fluid) can significantly impair power output and cognitive function. Aim for at least 16 oz of water before your session and sip consistently throughout.

    Post-workout recovery: Within 30–60 minutes after training, aim for a protein-carb combination — a protein shake with a banana, or Greek yogurt with berries — to replenish glycogen and support muscle repair. Research from the Journal of Nutrition and Metabolism supports this post-exercise nutrition window for optimizing recovery in resistance and power-based training.

    How Long Until You See Results — and What to Track

    One of the most common questions about any new training approach is: "When will I actually notice a difference?" Here’s an honest, research-grounded answer.

    Weeks 1–2: You’ll primarily notice improved body awareness, better coordination, and a surprising level of cardiorespiratory challenge from the explosive work. Your heart rate will likely spike more than expected. This is normal — and productive.

    Weeks 3–4: The neuromuscular adaptations begin. Your throws become sharper, your slams more powerful, and your core activation more automatic. You may notice less lower back fatigue during daily activities.

    Weeks 6–8: Visible changes in core definition and functional strength typically begin to emerge. Research supports 6–8 weeks as the benchmark for measurable improvements in power output and core endurance in adult populations doing structured medicine ball training.

    Metrics to track:

    • Wall ball height consistency (are you hitting the same target?)
    • Slam force and sound (is it getting louder and more powerful?)
    • Perceived exertion (does the same session feel easier over time?)
    • Core endurance — can you maintain form through longer sets?
    • Daily energy levels and lower back comfort

    Results vary significantly based on your starting fitness level, training frequency, sleep quality, and nutrition. If you’re not seeing progress after 8 weeks, consider consulting a certified personal trainer for a personalized program adjustment.

    Frequently Asked Questions

    Is medicine ball training safe for beginners over 50?
    Yes — with appropriate modifications. Start with a lighter ball (4–8 lbs), focus on controlled movements before adding speed, and avoid high-impact slams if you have knee or lower back concerns. Wall throws and seated rotational exercises are excellent entry points. Always consult your physician before starting a new training program, especially if you have existing joint issues.

    How often should I do medicine ball training per week?
    Two to three sessions per week is the sweet spot for most adults. This allows adequate recovery between explosive sessions while still providing enough stimulus for adaptation. You can integrate medicine ball work into your existing routine as a standalone circuit or as a power-focused warm-up before strength training.

    Can medicine ball training help with weight loss?
    It can contribute meaningfully, particularly when combined with a calorie-conscious nutrition plan. Explosive training like medicine ball work elevates your heart rate, increases post-exercise oxygen consumption (EPOC), and builds metabolically active muscle tissue. However, it’s most effective as part of a comprehensive fitness and nutrition strategy rather than a standalone weight loss tool.

    Do I need a special floor or wall for medicine ball slams?
    For slams, you’ll want a rubber or foam medicine ball (not a hard leather one) and a durable rubber floor or turf surface. Standard gym floors work fine; hardwood or tile at home may crack under repeated impact. For wall throws, use a solid concrete or brick wall — drywall is not appropriate for this purpose.

    How is medicine ball training different from kettlebell or dumbbell training?
    Kettlebells and dumbbells are excellent tools for building strength, stability, and muscle mass through progressive loading. Medicine balls focus more on power development, rotational strength, and explosive neuromuscular training. They complement each other well — and if you’ve already explored kettlebell training, medicine balls are a fantastic addition to your tool kit.

    Your Next Step Starts Today

    Medicine ball training won’t transform your body overnight — nothing sustainable does. But if you commit to two or three sessions a week with intention and proper technique, you’ll start feeling more powerful, more coordinated, and more capable within a matter of weeks.

    The real win isn’t just what happens in the gym. It’s the way your body starts to move through everyday life with more ease, confidence, and resilience. That’s what this kind of training builds — and that’s worth showing up for.

    Start with a 6–8 lb ball, master the wall ball shot and the overhead slam, and give it four weeks. You might be surprised by how quickly your body responds to something new and intentional.

    Small, consistent effort beats perfection every time. Pick up the ball.

    This article is for informational and educational purposes only. The content is not intended to replace professional medical, nutritional, or fitness advice. Always consult a qualified healthcare provider, registered dietitian, or certified fitness professional before starting a new health program or making significant changes to your lifestyle.

    Content reviewed by our wellness editorial team, with references to peer-reviewed research and guidelines from leading health organizations.
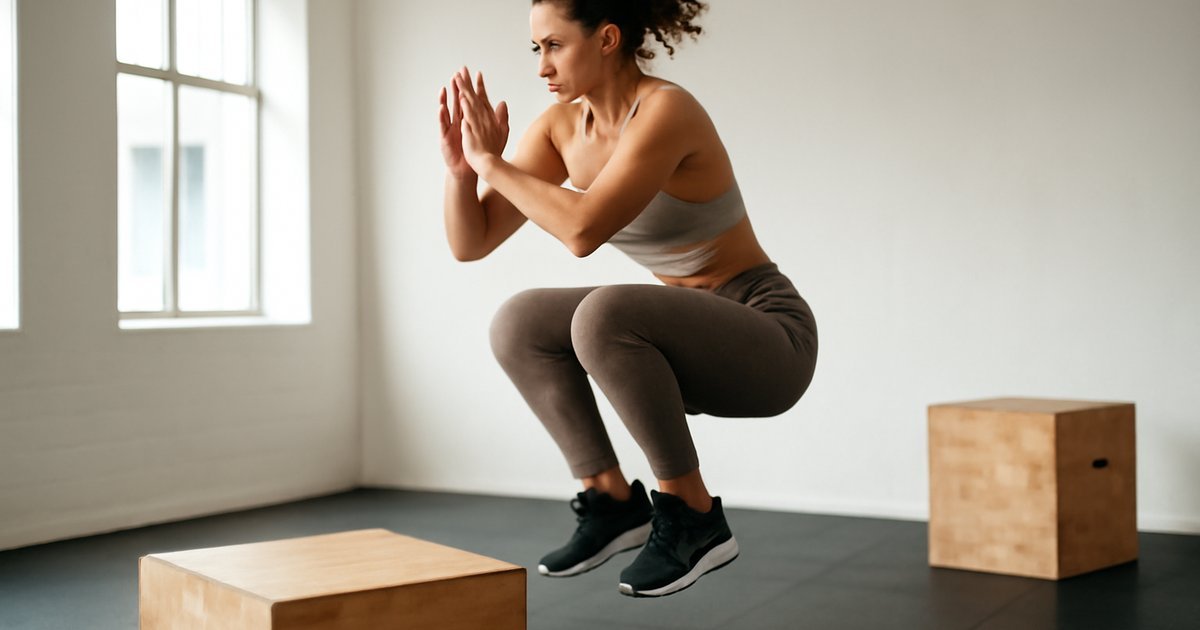
  • Plyometric Training: Power, Speed & Results for Adults

    Plyometric Training: Power, Speed & Results for Adults

    You don’t have to be an athlete to train like one — and plyometrics might be the missing piece your fitness routine has been waiting for.

    Why Most Adults Overlook Plyometric Training

    Think about the last time you had to move fast — catching yourself from a fall, sprinting to grab the elevator, or lunging to catch something off a shelf. Those split-second movements require a quality most gym routines completely ignore: power.

    Plyometric training — also called "jump training" or explosive training — is built around exactly that. And while it’s commonly associated with elite athletes and NFL combine drills, the science increasingly shows it’s one of the most effective tools adults of any fitness level can use to build strength, burn calories, and protect long-term joint and bone health.

    Yet most people over 30 avoid it entirely. Maybe it looks too intense. Maybe they assume their knees can’t handle it. Maybe they just don’t know where to start.

    This guide is here to change that. You’ll learn what plyometric training actually is, what the research says about its benefits, how to start safely — whether you’re a complete beginner or someone ready to level up — and what mistakes to avoid along the way.

    No Olympic experience required.

    Why Plyometric Training Matters More Than You Think

    Here’s something most gym-goers don’t know: your muscles have two speeds. There’s the slow, controlled force you use during a typical squat or bicep curl — and then there’s the explosive, rapid-fire force that fires during a jump, sprint, or quick change of direction.

    That second speed — called rate of force development (RFD) — naturally declines with age if you don’t specifically train it. According to research published in the Journal of Strength and Conditioning Research, explosive power tends to decrease faster than general strength as adults age, often beginning as early as the mid-30s.

    This matters for more than athletic performance. Explosive leg power is strongly linked to fall prevention, functional independence, and even metabolic health. A study supported by the National Institute on Aging found that lower-body power — not just strength — was one of the strongest predictors of mobility and quality of life in aging adults.

    Plyometric training directly targets this quality. By training your muscles to generate force quickly, you’re building a physical reserve that pays dividends in everyday movement, injury prevention, and body composition.

    The American College of Sports Medicine (ACSM) includes power training as a recommended component of a well-rounded adult fitness program — not just for athletes, but for general health and functional fitness.

    The Science Behind Plyometrics: How It Actually Works

    Plyometric exercises work through what’s called the stretch-shortening cycle (SSC). Here’s the simplified version: when a muscle rapidly lengthens (like when you sink into a squat before a jump), it stores elastic energy — similar to a rubber band being pulled back. When it then quickly contracts (the jump itself), it releases that stored energy with added force.

    The result is more power output than a slow, deliberate muscle contraction alone could generate.

    Over time, consistent plyometric training improves the efficiency of this cycle. Your neuromuscular system — the connection between your brain and your muscles — learns to recruit more muscle fibers, faster. This is why plyometrics can improve speed, agility, and overall athletic ability even without adding significant muscle mass.

    Busting a common myth: Many adults assume plyometrics are too hard on the joints. But research tells a more nuanced story. A 2020 review in the British Journal of Sports Medicine found that progressive, properly loaded plyometric training can actually strengthen tendons and improve cartilage health when introduced gradually. The key word is progressive — the problem isn’t plyometrics, it’s starting too hard, too fast.

    Low-impact plyometric variations also exist, making this training style accessible even for those with mild knee or hip concerns. More on that below.

    How to Get Started with Plyometric Training

    Before anything else: a foundation of basic strength matters. If you’re not yet comfortable with bodyweight squats, lunges, and push-ups performed with good form, spend 4-6 weeks building that base first. You can explore compound exercises for full-body strength as a solid starting point.

    Once you’re ready, here’s how to structure your introduction to plyometrics:

    Beginner Level (Weeks 1-4)

    • Box step-ups with a power emphasis: Drive off the standing leg explosively instead of stepping slowly. Great for building hip and glute power without high impact.
    • Squat jumps (low amplitude): Drop only slightly into the squat and jump just a few inches off the ground. Focus on landing softly, absorbing force through the hips and knees.
    • Standing long jump: Jump forward and stick the landing. This teaches deceleration — critical for joint safety.
    • Lateral shuffles: Quick, side-to-side steps that train lateral power and coordination.

    Volume: 2 days per week, 2-3 sets of 6-8 reps per exercise. Allow 48 hours of recovery between sessions.

    Intermediate Level (After 4-6 Weeks)

    • Box jumps (12-18 inch box): Step down — don’t jump down — to minimize eccentric stress on your joints.
    • Broad jumps: Maximize horizontal distance and stick each landing for 2-3 seconds before resetting.
    • Split jumps (scissor lunges): Alternate legs mid-air. Excellent for unilateral power and hip stability.
    • Lateral bounds: Single-leg jumps side to side, landing on the opposite foot.

    Volume: 2-3 days per week, 3 sets of 8-10 reps. Prioritize quality over quantity — plyometrics should never be done to fatigue.

    Advanced Level

    • Depth jumps, hurdle hops, single-leg box jumps, and reactive drills — these are best introduced with guidance from a certified strength and conditioning coach.

    Pairing plyometric work with a smart overall training plan is key. If you haven’t yet built a consistent fitness routine, check out this guide on building a sustainable workout routine before adding explosive training to the mix.

    Common Mistakes That Sabotage Your Results

    Plyometrics are highly effective — but also easy to get wrong. Here are the most frequent errors adults make, and how to course-correct:

    1. Skipping the landing mechanics. This is the biggest one. Many people focus entirely on how high or how far they jump — and completely ignore the landing. Poor landings (knees caving in, torso collapsing forward, heels hitting first) are where most plyometric injuries happen. Fix: Practice landing drills in isolation. Step off a low box and absorb the impact — knees tracking over toes, soft bend in hips and knees, chest up.

    2. Doing plyometrics when fatigued. Unlike steady-state cardio, plyometrics require your nervous system to be fresh. Doing box jumps at the end of a long strength session — or on poor sleep — dramatically increases injury risk and reduces power output. Fix: Always do plyometric work at the beginning of your training session, after a proper warm-up but before other heavy lifting.

    3. Progressing too fast, too soon. Enthusiasm is great — but jumping from beginner squat jumps to depth jumps in two weeks is a recipe for tendon overuse injuries. Fix: Follow the 10% rule — don’t increase intensity, volume, or height by more than 10% per week. Your tendons adapt more slowly than your muscles.

    4. Neglecting the warm-up. Cold muscles and connective tissue don’t absorb impact efficiently. Fix: Spend 8-10 minutes on dynamic warm-up movements — leg swings, high knees, hip circles, and light jogging — before any plyometric session. For a full mobility and warm-up approach, this guide to mobility training is worth bookmarking.

    What to Eat to Support Plyometric Training

    Explosive training has specific nutritional demands that differ somewhat from traditional endurance or strength training.

    Carbohydrates are your primary fuel source. Plyometrics rely heavily on the phosphocreatine and glycolytic energy systems — both of which are fueled by carbohydrates. The Academy of Nutrition and Dietetics recommends that adults engaged in high-intensity training consume 45-65% of daily calories from carbohydrates, with a pre-workout meal prioritizing easily digestible carbs 1-2 hours before training.

    • Good pre-session options: oatmeal with banana, whole grain toast with peanut butter, or a small portion of brown rice with lean protein.

    Protein supports muscle repair and tendon recovery. Research consistently supports 0.7-1.0 grams of protein per pound of body weight for active adults engaged in resistance and power training. Prioritize high-quality sources: chicken breast, eggs, Greek yogurt, salmon, legumes, or cottage cheese.

    Don’t skip post-workout nutrition. The 30-60 minute window after explosive training is ideal for a protein-carbohydrate combination to support glycogen replenishment and muscle protein synthesis. A simple option: a Greek yogurt parfait with berries, or a protein shake with a banana.

    Collagen and vitamin C for tendon support. Emerging research — including a study published in the American Journal of Clinical Nutrition — suggests that consuming 15 grams of collagen peptides with vitamin C approximately 30-60 minutes before exercise may support connective tissue adaptation. Results vary, and this remains an area of active research.

    Stay hydrated. Even mild dehydration (as little as 2% body weight) can impair neuromuscular performance, which directly affects your power output and reaction time during explosive movements.

    How Long Until You See Results — and What to Track

    Plyometric training produces results on multiple timelines, and it helps to know what to expect so you don’t abandon ship too early.

    Weeks 1-2: You’ll notice improved coordination and body awareness during explosive movements. These are neurological adaptations — your brain is learning to recruit muscle fibers more efficiently. Don’t expect dramatic physical changes yet.

    Weeks 3-6: Noticeable improvements in jump height, landing stability, and overall quickness. Many adults also begin feeling more energized in daily movement — stairs feel easier, posture improves, and workouts feel more dynamic.

    Weeks 6-12: Measurable changes in lower-body power, body composition (particularly in combination with proper nutrition), and cardiovascular conditioning. Research published in the Journal of Sports Science and Medicine found significant improvements in vertical jump performance and sprint speed in non-athlete adults after just 8 weeks of twice-weekly plyometric training.

    What to track:

    • Standing vertical jump height (measure monthly)
    • Standing broad jump distance
    • How you feel on stairs, during sports, or during quick movements in daily life
    • Recovery time between sets (should improve over weeks)
    • Body weight and circumference measurements if body composition is a goal

    When to reassess or seek professional guidance: If you experience persistent joint pain (not to be confused with normal muscle soreness), sharp discomfort during landings, or pain that lingers more than 48 hours, stop and consult a sports medicine physician or physical therapist before continuing.

    Frequently Asked Questions

    Is plyometric training safe for adults over 40?
    Yes — with appropriate progression. Adults over 40 may need a longer warm-up, more recovery time between sessions, and a more gradual introduction to impact. Starting with low-amplitude variations and building over 6-8 weeks is key. A 2019 study in the Journal of Aging and Physical Activity found that older adults who completed 12 weeks of modified plyometric training improved power output and balance without significant injury rates.

    How many days per week should I do plyometrics?
    For most adults, 2-3 days per week is optimal, with at least 48 hours between sessions. Your tendons and nervous system need more recovery time than your cardiovascular system does. More frequent training doesn’t accelerate results — it tends to increase injury risk instead.

    Can I do plyometrics if I have bad knees?
    It depends on the cause of your knee issues. Mild patellofemoral discomfort or general "achy knees" may actually improve with properly progressed plyometric training due to improved neuromuscular control and tendon strengthening. However, if you have a diagnosed condition — like severe osteoarthritis or a recent ligament injury — consult a physical therapist or orthopedic specialist before starting. Low-impact variations (lateral shuffles, banded jumps in water, step-up variations) may still be appropriate.

    Do I need equipment to do plyometrics at home?
    Not at all. Many effective plyometric movements — squat jumps, broad jumps, lateral bounds, split jumps, and skater hops — require nothing but your body and a safe, non-slip surface. If you want to progress further, a 12-18 inch plyo box is a worthwhile investment, but it’s absolutely not required to get started.

    Will plyometrics help me lose weight?
    Plyometric training is a high-intensity activity that can contribute meaningfully to calorie burn and body composition improvement — but it’s not a standalone solution. When combined with consistent nutrition habits and overall training volume, it can support fat loss while preserving or increasing lean muscle mass. Body composition changes typically become noticeable after 8-12 weeks of consistent effort paired with adequate protein intake.

    Start Where You Are — Then Build

    Plyometric training isn’t just for athletes, young adults, or people in peak physical condition. It’s a scientifically validated approach to building power, protecting your joints, improving body composition, and moving better in everyday life — all things that matter deeply as you move through your 30s, 40s, and 50s.

    You don’t need to do box jumps on day one. You just need to start somewhere. A few squat jumps, a lateral shuffle, a power step-up — done consistently and progressively — can completely change how your body feels and functions over time.

    The best version of explosive training isn’t the most dramatic. It’s the one you build carefully, sustain over months, and actually enjoy.

    Pick one beginner movement from this guide and add it to your next workout. That’s your only goal today.


    Wellness Disclaimer: This article is for informational and educational purposes only. The content is not intended to replace professional medical, nutritional, or fitness advice. Always consult a qualified healthcare provider, registered dietitian, or certified fitness professional before starting a new health program or making significant changes to your lifestyle.

    Author Line: Content reviewed by our wellness editorial team, with references to peer-reviewed research and guidelines from leading health organizations.